
Things have been so busy lately with school starting. I am trying to take this Labor Day weekend to not even THINK about school and just enjoy time with my family. I have done pretty well so far besides an hour or two of school Pinterest and Instagram browsing...
I saw a photo on Instagram of a super cute computer background in a teacher's classroom, and I realized then that I have had the same stock photo on my school computer for SIX years now. I just never thought about changing it.
It was a simple and quick task, and something just for me to enjoy. I made a similar one for my home computer, but instead of having "Mrs. Ryder" on it, I simply made it for our family-- "The Ryders". By the way, if you're ever going to use your last name in a sign of any kind for your family, please don't use an apostrophe before the 's'. Just trust me! #grammarnazi
Here is what my home PC screen looks like now:
 I love it.
Here's how you can make your own, too. You'll need:
 It should start out like this:
 To get a blank canvas, find where it says "Layout" and click the drop-down options. Go down to "Blank" and click. Your page should be totally blank now!
 Almost ready to start decorating, I promise! These are the steps I go through every time I create anything. Once you do it a few times, it only takes about 5 seconds to get through these steps. I use PPT for EVERYTHING because it's so versatile. Back to the tutorial...
Now, we need to get our slide size correct. Find the "Design" tab across the top (click it), then all the way to the right you will see "Slide Size" (click it), and that will open up the drop down menu where you'll need to go to the bottom option "Custom Slide Size" (click it):
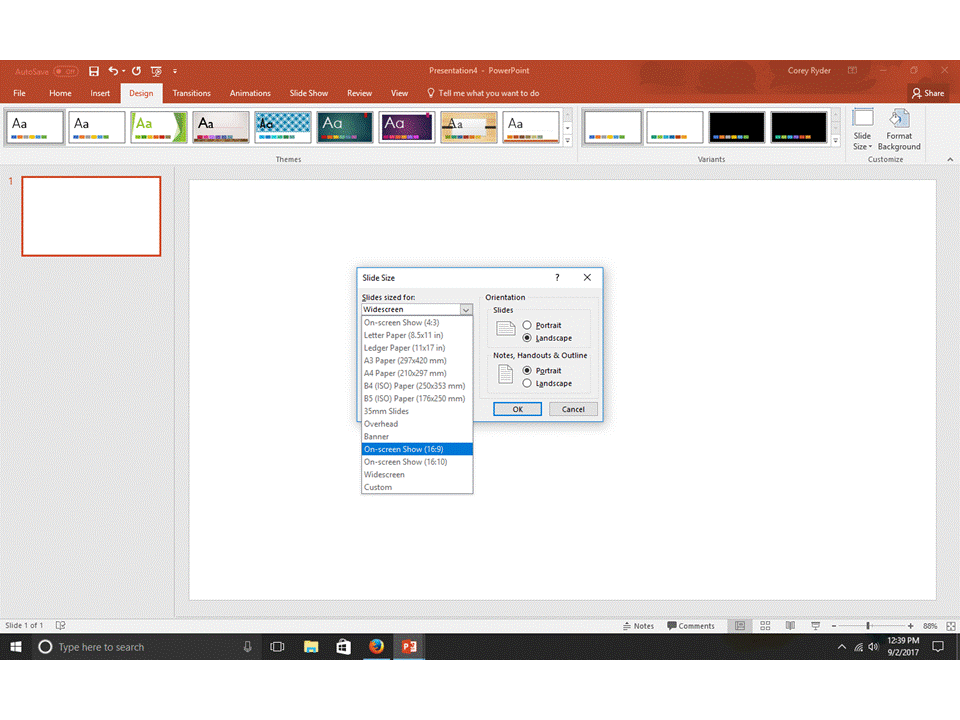
 This will bring up a box- click the drop-down option under "Slides sized for" and select "On Screen Show (16:9)". That's what worked best for my computer screen. Feel free to play around with the sizing later if it doesn't look right for your computer.
 Then click "OK", and you're done with set up!! Woohoo! Now on to the fun part.
The main functions you will need now are under the "Home" and "Insert" tabs. Remember my background that I made with the stripes and flowers? I created the stripes by simply adding black rectangles (Insert > Shapes > Rectangle). You can stretch shapes out any way you want them, and you can change their fill & outline colors also.
To add text, click Insert > Text Box , then click & drag out the size of text box you want. You can always reshape it anyway you want at any time. You can also change the size, color, & font if you have the text box selected and click "Home", then adjust those things from the drop-down options.
You really just have to play around with it and you will get used to the options pretty quickly! You can find free clip art or background downloads or just save googled images to use. I found my pretty watercolor floral clipart at foxandhazel.com. Click here to get it for yourself!
To insert any images that you want, just go to Insert > Pictures , and find the place you saved the image(s) on your computer. Once it's inserted into your slide, you can drag it wherever you want and resize it however you want. You can also format it to be "in front of" or "behind" other items. Like I've said, just play around!
Teachers Pay Teachers has a ton of "Free for Personal Use" backgrounds (chevron, designs, frames etc) and clip art images. That is also where I find some of my favorite FONTS! This is my favorite place to download Free for Personal Use fonts!! They are so cute.
Sooo, once you are content with what you've created, here's how to make your slide an "image" to put as your computer background:
At the very top left, click "File", then "Save As". It will bring up the save box. Make sure it is showing the place on your computer you want to save it to-- I like to save mine under "Pictures". Then name your creation whatever you'd like, and then under the name is a drop-down box titled "Save as Type". Go down to JPEG and click. Then click "Save", and you're almost finished!
Go to your computer home screen (minimize everything until you are at your computer background). Right-click anywhere on the screen and go to "Personalize" (or something similar if yours is different). An option to "upload" a picture is there to click. Then browse for the file (JPEG) that you just saved, and choose it. Mine looks best when I choose the option "Fit" for how I want my photo on the background.
Now exit out of that and see what you think! Here is the one for my school computer:
 I know that was a long tutorial, but it really is not all that complicated. I was not taught any of this, I just played around with PowerPoint until I caught on. Now I make all my lesson plans, schedules, worksheets, etc on PPT.
If you love my designs with the b&w stripes and flowers, find some free binder covers in the same design in my TPT store here. I love sharing FREE items on there, so check it out sometime. :)
Happy creating!
XOXO,
Mrs. Ryder
I saw a photo on Instagram of a super cute computer background in a teacher's classroom, and I realized then that I have had the same stock photo on my school computer for SIX years now. I just never thought about changing it.
It was a simple and quick task, and something just for me to enjoy. I made a similar one for my home computer, but instead of having "Mrs. Ryder" on it, I simply made it for our family-- "The Ryders". By the way, if you're ever going to use your last name in a sign of any kind for your family, please don't use an apostrophe before the 's'. Just trust me! #grammarnazi
Here is what my home PC screen looks like now:

Here's how you can make your own, too. You'll need:
- PowerPoint
- Images or backgrounds that you prefer to use
- Font(s) that you prefer


Now, we need to get our slide size correct. Find the "Design" tab across the top (click it), then all the way to the right you will see "Slide Size" (click it), and that will open up the drop down menu where you'll need to go to the bottom option "Custom Slide Size" (click it):

The main functions you will need now are under the "Home" and "Insert" tabs. Remember my background that I made with the stripes and flowers? I created the stripes by simply adding black rectangles (Insert > Shapes > Rectangle). You can stretch shapes out any way you want them, and you can change their fill & outline colors also.
To add text, click Insert > Text Box , then click & drag out the size of text box you want. You can always reshape it anyway you want at any time. You can also change the size, color, & font if you have the text box selected and click "Home", then adjust those things from the drop-down options.
You really just have to play around with it and you will get used to the options pretty quickly! You can find free clip art or background downloads or just save googled images to use. I found my pretty watercolor floral clipart at foxandhazel.com. Click here to get it for yourself!
To insert any images that you want, just go to Insert > Pictures , and find the place you saved the image(s) on your computer. Once it's inserted into your slide, you can drag it wherever you want and resize it however you want. You can also format it to be "in front of" or "behind" other items. Like I've said, just play around!
Teachers Pay Teachers has a ton of "Free for Personal Use" backgrounds (chevron, designs, frames etc) and clip art images. That is also where I find some of my favorite FONTS! This is my favorite place to download Free for Personal Use fonts!! They are so cute.
Sooo, once you are content with what you've created, here's how to make your slide an "image" to put as your computer background:
At the very top left, click "File", then "Save As". It will bring up the save box. Make sure it is showing the place on your computer you want to save it to-- I like to save mine under "Pictures". Then name your creation whatever you'd like, and then under the name is a drop-down box titled "Save as Type". Go down to JPEG and click. Then click "Save", and you're almost finished!
Go to your computer home screen (minimize everything until you are at your computer background). Right-click anywhere on the screen and go to "Personalize" (or something similar if yours is different). An option to "upload" a picture is there to click. Then browse for the file (JPEG) that you just saved, and choose it. Mine looks best when I choose the option "Fit" for how I want my photo on the background.
Now exit out of that and see what you think! Here is the one for my school computer:

If you love my designs with the b&w stripes and flowers, find some free binder covers in the same design in my TPT store here. I love sharing FREE items on there, so check it out sometime. :)
Happy creating!
XOXO,
Mrs. Ryder
Comments
Post a Comment